Edit Project Time
General Information
The "Edit project times" mask allows the user to enter project times that were not booked directly by a stopwatch (project time booking) after the event. In addition, already recorded project times can be edited or deleted.
The user currently logged in is always defined automatically as the person making the booking. The possibility to search for other persons or to switch between persons and edit the project times entered by others is only available for users with administration rights (members of a PTM admin group, more on this under Authorization Management).
Edit project times
If you are in the input mask, you must first select the relevant year or calendar week. The input mask is limited to one week in normal view, by default the current calendar week is preset and proposed. With the arrow keys you can navigate between the calendar weeks or select any calendar week from the dropdown list. If you are in the desired year or calendar week, you can start recording the project time.
Project time recording can only be done afterwards, not on days that lie in the future!
The following data is to be entered and displayed in the data entry table:
per project booking:
|
Day (fixed) |
The date for which the project time is to be registered. |
|---|---|
|
Project |
To identify the project, the short name with the fixed prefix is displayed here, the full project name is automatically added in the field to the right of it. |
|
Activity |
Selection of one of the predefined activities in the project |
|
Customer |
Selection of a customer, if added to the project |
|
Description |
Here you can describe in more detail how the time to be recorded was used to get an even better overview of the work done during the course of the project. |
|
From |
Time at which work on the project started |
|
Till |
Time at which work on the project ended/was interrupted |
|
Time |
This is the difference that results from start and end time - it indicates how long the project was worked on (in hours). As an alternative to entering the from and to times, you can also only enter the time quantity in the "Time" field (e.g.: 1.30 for 1 hour and 30 minutes). |
|
Billable |
Possibility to mark the project time as billable |
|
Actions |
- By clicking
on - Click
on |
per day:
|
Sum. |
Short for sum. Here, the individually recorded project times per day are added together and displayed as a total sum. |
|---|---|
|
Att. |
Short for Attendance. The total attendance time of the respective day is displayed here. |
|
Diff. |
The difference between the presence time and the recorded project times is shown here. Depending on whether the attendance time exceeds or falls short of the project times or the values are the same, a negative (red), positive (blue) or 0 (green) value is displayed. |
Favorites 
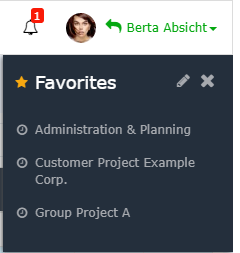
On the upper right side of the screen, the expandable button "Favorites" is located.

In this area, you can create your own templates for frequently booked project activities and quickly insert them into the entry screen, so that you only have to enter the start and end times manually. To add a new favorite, click on the "Edit" icon in the expanded Favorites field. In the now displayed table you can
edit already added favorites and add new ones.
If a new favourite is created via the "Add new favourite" button, a freely selectable name (e.g. "daily progress meeting") must be entered in the first field. Then the desired project should be selected. The colums "Bookable" and "Billable" are automatically filled based on the predefined project characteristics. The text that is written in the Comment field is later visible in the "Description" field in the entry mask. Optionally, customers and activities can also be saved in the Favorites template.
As soon as all mandatory fields are filled, the "Save" symbol appears - thus, the new favorite is saved in the system. By clicking on the "Delete" symbol you can delete the entry. Existing favorites can be edited by clicking on the "Edit" button.
Additional Options
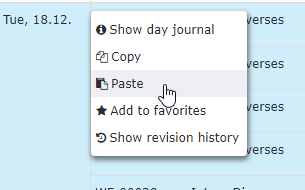
Clicking the right mouse button opens further options within the project overview table for the user. The respective actions refer to the line in which the mouse pointer is located when clicking.

Show day journal
By clicking here, a window with the user's daily journal for the
corresponding day opens.
Copy and Paste
The line content of the selected line is copied and
can be pasted into another line (on another day or on the same day) by
right-clicking with Paste. If the project time entry is copied
and pasted on the same day, the columns From and To
must be adjusted in the copy, since no overlapping intervals are
permitted.
The duplicate can be edited and adapted before saving. If the line was accidentally inserted wrongly, the process can be aborted using the "Cancel" button.
Add to favorites
Here, you can add a specific project booking directly to your
favorites. After clicking, a dialog window
opens to name the new favorite. After confirmation via the "OK"
button, the project is added to the favorites list.
Show revision history
A window opens which displays all project bookings made and edited for
the selected day in chronological order.
Keine Kommentare vorhanden.